 Git 常用命令
# Git 常用命令
| 命令名称 | 作用 |
|---|---|
| git config --global user.name 用户名 | 设置用户签名 |
| git config --global user.email | 设置用户签名 |
| git init | 初始化本地库 |
| git status | 查看本地库状态 |
| git add 文件名 | 添加到缓存区 |
| git commit -m"日志信息" 文件名 | 提交到本地库 |
| git reflog | 查看历史记录 |
| reset --hard 版本号 | 版本穿梭 |
# 设置用户签名
- 基本语法
git config --global user.name 用户名
git config --global user.email 邮箱
- 案例实操
全局范围的签名设置:
DELL@FRXcomputer MINGW64 /d/git-Space
$ git config --global user.name xustudyxu

DELL@FRXcomputer MINGW64 /d/git-Space
$ git config --global user.eamil 1812903531@qq.com

DELL@FRXcomputer MINGW64 /d/git-Space
$ cat ~/.gitconfig
[user]
        email = 1812903531@qq.com
        name = xustudyxu
1
2
3
4
5
6
7
8
9
10
11
2
3
4
5
6
7
8
9
10
11
提示
签名的作用是区分不同操作者身份。用户的签名信息在每一个版本的提交信息中能够看到,以此确认本次提交是谁做的。Git 首次安装必须设置一下用户签名,否则无法提交代码。
这里设置用户签名和将来登录 GitHub(或其他代码托管中心)的账号没有任何关系。
# 初始化本地库
- 基本语法
git init
- 案例实操
DELL@FRXcomputer MINGW64 /d/git-Space
$ git init
Initialized empty Git repository in D:/git-Space/.git/

DELL@FRXcomputer MINGW64 /d/git-Space (master)
$ ll -a
total 20
drwxr-xr-x 1 DELL 197121 0  1月 26 16:13 ./
drwxr-xr-x 1 DELL 197121 0  1月 26 16:08 ../
drwxr-xr-x 1 DELL 197121 0  1月 26 16:13 .git/
1
2
3
4
5
6
7
8
9
10
2
3
4
5
6
7
8
9
10
- 结果查看

# 查看本地库状态
- 基本语法
git status
- 案例实操
# 首次查看(工作区没有任何文件)
DELL@FRXcomputer MINGW64 /d/git-Space (master)
$ git status
On branch master

No commits yet

nothing to commit (create/copy files and use "git add" to track)
1
2
3
4
5
6
7
2
3
4
5
6
7
# 新增文件(hello.txt)
DELL@FRXcomputer MINGW64 /d/git-Space (master)
$ vim hello.txt

DELL@FRXcomputer MINGW64 /d/git-Space (master)
$ cat hello.txt
hello git!
1
2
3
4
5
6
2
3
4
5
6
# 再次查看(检测到未追踪的文件)
DELL@FRXcomputer MINGW64 /d/git-Space (master)
$ git status
On branch master

No commits yet

Untracked files:
  (use "git add <file>..." to include in what will be committed)
        hello.txt

nothing added to commit but untracked files present (use "git add" to track)
1
2
3
4
5
6
7
8
9
10
11
2
3
4
5
6
7
8
9
10
11
# 添加暂存区
# 将工作区的文件添加到暂存区
- 基本语法
git add 文件名
- 案例实操
DELL@FRXcomputer MINGW64 /d/git-Space (master)
$ git add hello.txt
warning: LF will be replaced by CRLF in hello.txt.
The file will have its original line endings in your working directory
1
2
3
4
2
3
4
# 查看状态(检测到暂存区有新文件)
DELL@FRXcomputer MINGW64 /d/git-Space (master)
$ git status
On branch master

No commits yet

Changes to be committed:
  (use "git rm --cached <file>..." to unstage)
        new file:   hello.txt
1
2
3
4
5
6
7
8
9
2
3
4
5
6
7
8
9
# 提交到本地库
# 将暂存区的文件提交到本地库
- 基本语法
git commit -m "日志信息" 文件名
- 案例实操
DELL@FRXcomputer MINGW64 /d/git-Space (master)
$ git commit -m"my first commit" hello.txt
warning: LF will be replaced by CRLF in hello.txt.
The file will have its original line endings in your working directory
[master (root-commit) dca1cdc] my first commit
 1 file changed, 1 insertion(+)
 create mode 100644 hello.txt
1
2
3
4
5
6
7
2
3
4
5
6
7
# 查看状态(没有文件需要提交)
DELL@FRXcomputer MINGW64 /d/git-Space (master)
$ git status
On branch master
nothing to commit, working tree clean
1
2
3
4
2
3
4
# 修改文件(hello.txt)
DELL@FRXcomputer MINGW64 /d/git-Space (master)
$ vim hello.txt

DELL@FRXcomputer MINGW64 /d/git-Space (master)
$ cat hello.txt
hello git! hi
1
2
3
4
5
6
2
3
4
5
6
# 查看状态(检测到工作区有文件被修改)
DELL@FRXcomputer MINGW64 /d/git-Space (master)
$ git status
On branch master
Changes not staged for commit:
  (use "git add <file>..." to update what will be committed)
  (use "git restore <file>..." to discard changes in working directory)
        modified:   hello.txt

no changes added to commit (use "git add" and/or "git commit -a")
1
2
3
4
5
6
7
8
9
2
3
4
5
6
7
8
9
# 将修改的文件再次添加暂存区
DELL@FRXcomputer MINGW64 /d/git-Space (master)
$ git add hello.txt
warning: LF will be replaced by CRLF in hello.txt.
The file will have its original line endings in your working directory
1
2
3
4
2
3
4
# 将暂存区的文件再次提交到本地库
DELL@FRXcomputer MINGW64 /d/git-Space (master)
$ git commit -m"my second commit" hello.txt
warning: LF will be replaced by CRLF in hello.txt.
The file will have its original line endings in your working directory
[master 0765edd] my second commit
 1 file changed, 1 insertion(+), 1 deletion(-)
1
2
3
4
5
6
2
3
4
5
6
# 查看状态
DELL@FRXcomputer MINGW64 /d/git-Space (master)
$ git status
On branch master
nothing to commit, working tree clean
1
2
3
4
2
3
4
# 历史版本
# 查看历史版本
- 基本语法
git reflog 查看版本信息
git log 查看版本详细信息
- 案例实操
DELL@FRXcomputer MINGW64 /d/git-Space (master)
$ git reflog
0765edd (HEAD -> master) HEAD@{0}: commit: my second commit
dca1cdc HEAD@{1}: commit (initial): my first commit
1
2
3
4
2
3
4
DELL@FRXcomputer MINGW64 /d/git-Space (master)
$ git log
commit 0765eddb29d5ef8184ecb161d339398bb2ec8dff (HEAD -> master)
Author: xustudyxu <1812903531@qq.com>
Date:   Wed Jan 26 18:54:55 2022 +0800

    my second commit

commit dca1cdc5f1360eb7fff3d0269368664a49f21898
Author: xustudyxu <1812903531@qq.com>
Date:   Wed Jan 26 17:54:37 2022 +0800

    my first commit
1
2
3
4
5
6
7
8
9
10
11
12
13
2
3
4
5
6
7
8
9
10
11
12
13
# 版本穿梭
- 基本语法
git reset --hard 版本号
- 案例实操
- 查看hello.txt内容
DELL@FRXcomputer MINGW64 /d/git-Space (master)
$ cat hello.txt
hello git! hi
1
2
3
2
3
- 首先查看当前的历史记录,可以看到当前是在 0765edd 这个版本
DELL@FRXcomputer MINGW64 /d/git-Space (master)
$ git reflog
0765edd (HEAD -> master) HEAD@{0}: commit: my second commit
dca1cdc HEAD@{1}: commit (initial): my first commit
1
2
3
4
2
3
4
- 切换到 dca1cdc版本,也就是我们第一次提交的版本
DELL@FRXcomputer MINGW64 /d/git-Space (master)
$ git reset --hard dca1cdc
HEAD is now at dca1cdc my first commit
1
2
3
2
3
- 切换完毕之后再查看历史记录,当前成功切换到了dca1cdc版本
DELL@FRXcomputer MINGW64 /d/git-Space (master)
$ git reflog
dca1cdc (HEAD -> master) HEAD@{0}: reset: moving to dca1cdc
0765edd HEAD@{1}: commit: my second commit
dca1cdc (HEAD -> master) HEAD@{2}: commit (initial): my first commit
1
2
3
4
5
2
3
4
5
- 然后查看文件 hello.txt,发现文件内容跟第一次提交完全一致!
DELL@FRXcomputer MINGW64 /d/git-Space (master)
$ cat hello.txt
hello git!
1
2
3
2
3
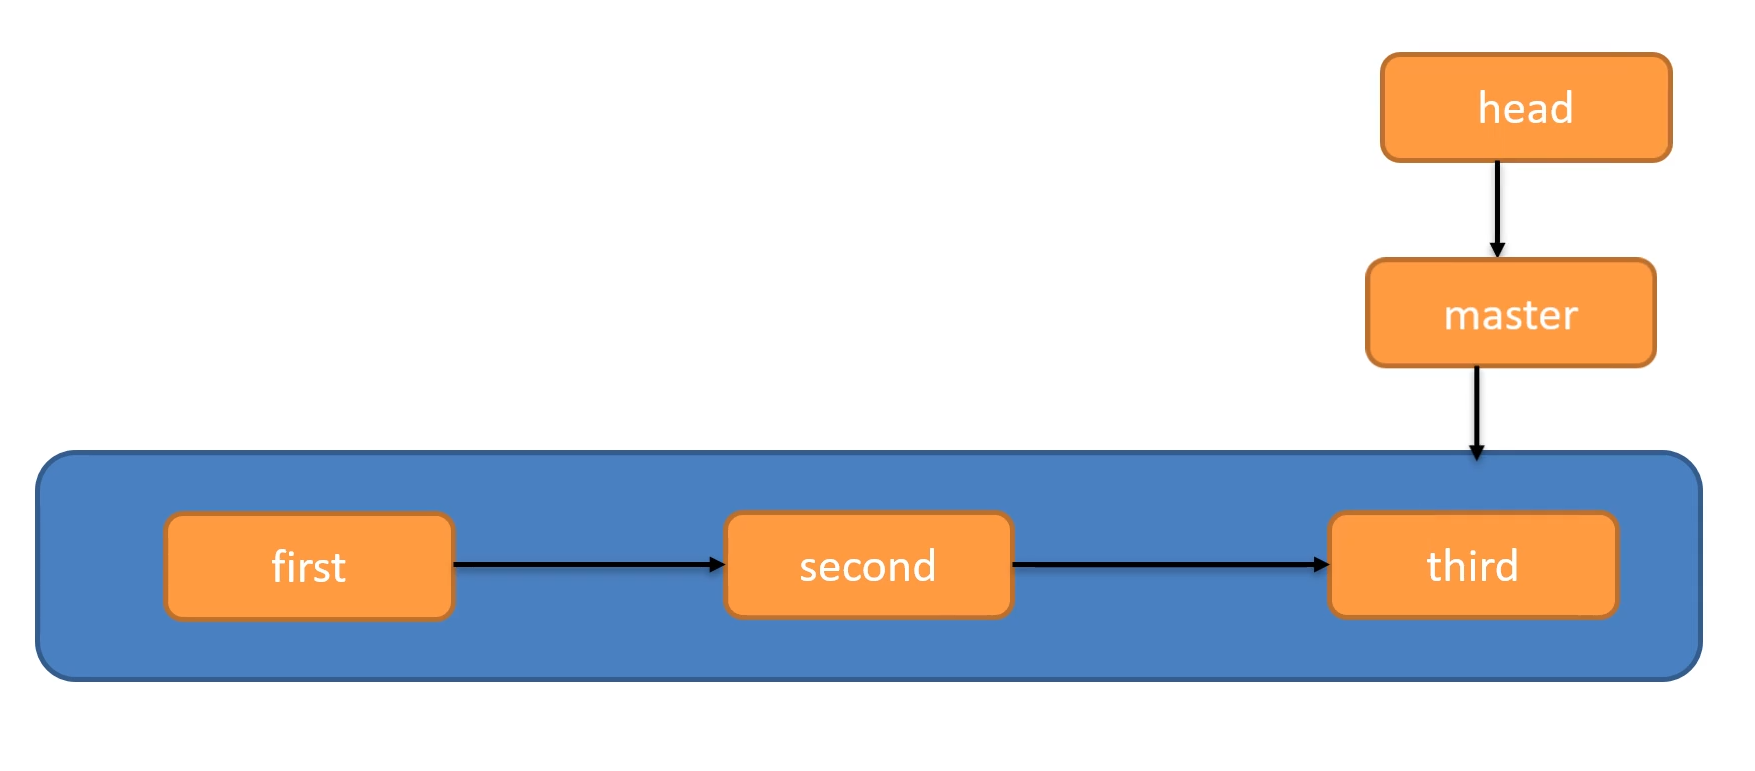
Git 切换版本,底层其实是移动的 HEAD 指针,具体原理如下图所示。
上次更新: 2024/04/21, 09:42:22