 页面优化与数据处理的深入实践
# 优化
# then变为async和await
因为then是Promise提供的方法,而promise的then可以简化为async和await的方式
# api封装
统一封装在api目录下
# 1. 楼层区域
# 1.1 标题结构
标题区域结构
<!-- 楼层区域 -->
<view class="floor-list">
  <!-- 楼层 item 项 -->
  <view class="floor-item">
    <!-- 楼层标题 -->
    <image src="https://api-hmugo-web.itheima.net/pyg/pic_floor01_title.png" class="floor-title"></image>
  </view>
</view>
1
2
3
4
5
6
7
8标题区域样式-(直接复制)
.floor-list {
  .floor-item {
    .floor-title {
      height: 60rpx;
      width: 100%;
    }
  }
}
1
2
3
4
5
6
7
8
# 1.2 图片区域
结构
<!-- 楼层区域 -->
<view class="floor-list">
  <!-- 楼层 item 项 -->
  <view class="floor-item">
    <!-- 楼层标题 -->
    <image src="https://api-hmugo-web.itheima.net/pyg/pic_floor01_title.png" class="floor-title"></image>
    <!-- 楼层图片区域 -->
    <view class="image_box">
      <!-- 左侧大图片的盒子 -->
      <image class="left" src="https://api-hmugo-web.itheima.net/pyg/pic_floor01_1@2x.png"></image>
      <!-- 右侧 4 个小图片的盒子 -->
      <view class="right">
        <image src="https://api-hmugo-web.itheima.net/pyg/pic_floor01_1@2x.png"></image>
        <image src="https://api-hmugo-web.itheima.net/pyg/pic_floor01_1@2x.png"></image>
        <image src="https://api-hmugo-web.itheima.net/pyg/pic_floor01_1@2x.png"></image>
        <image src="https://api-hmugo-web.itheima.net/pyg/pic_floor01_1@2x.png"></image>
      </view>
    </view>
  </view>
</view>
1
2
3
4
5
6
7
8
9
10
11
12
13
14
15
16
17
18
19
20css样式
.image_box {
  display: flex;
  justify-content: space-between;
  padding-left: 10rpx;

  .left {
    width: 232rpx;
    height: 392rpx;
    float: left;
  }

  .right {
    width: 500rpx;
    display: flex;
    flex-wrap: wrap;
    justify-content: space-around;
    align-content: space-between;

    image {
      width: 233rpx;
      height: 190rpx;
    }
  }
}
1
2
3
4
5
6
7
8
9
10
11
12
13
14
15
16
17
18
19
20
21
22
23
24
# 1.3 动态渲染
获取数据
methods: {
  // 跳转到商品详情
  getFloors() {
    //第一个参数就是接口地址
    fly.get('https://api-hmugo-web.itheima.net/api/public/v1/home/floordata').then(res => {
      this.floors = res.data.message
    })
  },
},
  onLoad() {
    this.getHomeSwipers()
    this.getFloors()
  }
1
2
3
4
5
6
7
8
9
10
11
12
13渲染数据
<!-- 楼层区域 -->
<view class="floor-list">
  <!-- 楼层 item 项 -->
  <view class="floor-item" v-for="(item, i) in floors" :key="i">
    <!-- 楼层标题 -->
    <image :src="item.floor_title.image_src" class="floor-title"></image>
    <!-- 楼层图片区域 -->
    <view class="image_box">
      <!-- 左侧大图片的盒子 -->
      <image class="left" :src="item.product_list[0].image_src"></image>
      <!-- 右侧 4 个小图片的盒子 -->
      <view class="right">
        <image v-for="(item2, i2) in item.product_list" :key="i2" v-if="i2 !== 0" :src="item2.image_src"></image>
      </view>
    </view>
  </view>
</view>
1
2
3
4
5
6
7
8
9
10
11
12
13
14
15
16
17# 1.4 条转到商品列表页
创建商品列表页
注册事件
<!-- 楼层图片区域 -->
<view class="image_box">
  <!-- 左侧大图片的盒子 -->
  <image @click="goGoodsList(item.product_list[0])" class="left" :src="item.product_list[0].image_src"></image>
  <!-- 右侧 4 个小图片的盒子 -->
  <view class="right">
    <image @click="goGoodsList(item2)" v-for="(item2, i2) in item.product_list" :key="i2" v-if="i2 !== 0" :src="item2.image_src"></image>
  </view>
</view>
1
2
3
4
5
6
7
8
9定义事件函数进行跳转
goGoodsList(item) {
  uni.navigateTo({
    url: "/pages/goods_list/goods_list?" + item.navigator_url.split('?')[1]
  })
}
1
2
3
4
5
# 2. 商品列表
为了方便开发商品分类页面,建议大家通过微信开发者工具,新建商品列表页面的编译模式:
# 2.1 商品列表静态结构
安装vant/weapp组件
npm i @vant/weapp1新建wxcomponents/vant,将weapp的dist文件复制进去
添加配置
"globalStyle": {
		"navigationBarTextStyle": "white",
		"navigationBarTitleText": "黑马优购",
		"navigationBarBackgroundColor": "#C00000",
		"backgroundColor": "#FFFFFF",
		"usingComponents": {
			"van-card": "/wxcomponents/vant/dist/card/index"
		},
		"ignoreDevUnusedFiles": false
	},
1
2
3
4
5
6
7
8
9
10使用组件
<van-card
          price="2.00"
          title="商品标题"
          thumb="https://img3.doubanio.com/f/movie/8dd0c794499fe925ae2ae89ee30cd225750457b4/pics/movie/celebrity-default-medium.png"
          />
1
2
3
4
5
# 2.2 获取数据
准备请求参数
// 请求参数对象
				queryObj: {
				  // 查询关键词
				  query: '',
				  // 商品分类Id
				  cid: '',
				  // 页码值
				  pagenum: 1,
				  // 每页显示多少条数据
				  pagesize: 10
				},
1
2
3
4
5
6
7
8
9
10
11记录参数
onLoad(options) {
			// 将页面参数转存到 this.queryObj 对象中
			this.queryObj.query = options.query || ''
			this.queryObj.cid = options.cid || ''
			this.loadGoods()
		}
1
2
3
4
5
6封装请求方法记录数据
loadGoods() {
  fly.get('/goods/search', this.queryObj).then(res => {
    console.log(res)
    this.total = res.data.message.total
    this.goods = res.data.message.goods
  })
}
1
2
3
4
5
6
7
# 2.3 动态渲染
动态渲染
<template>
	<view>
		<van-card :thumb="item.goods_small_logo" v-for="item in goodsList" :key="item.goods_id"
			:price="item.goods_price" :title="item.goods_name" />

	</view>
</template>
1
2
3
4
5
6
7处理默认图片
data() {
  return {
    // 默认的空图片
    defaultPic: 'https://img3.doubanio.com/f/movie/8dd0c794499fe925ae2ae89ee30cd225750457b4/pics/movie/celebrity-default-medium.png'
  }
}
1
2
3
4
5
6并在页面渲染时按需使用:
<image :src="goods.goods_small_logo || defaultPic" class="goods-pic"></image>1
# 2.4 通过过滤器处理价格
定义全局过滤器
Vue.filter('toFixed', function(num) {
	return Number(num).toFixed(2)
})
1
2
3使用过滤器
:price="item.goods_price | toFixed"1
# 3 上拉加载更多
# 3.1 获取更多数据
打开项目根目录中的
pages.json配置文件,为subPackages分包中的goods_list页面配置上拉触底的距离:{ "path" : "pages/goods_list/goods_list", "style" : { "navigationBarTitleText": "", "onReachBottomDistance": 150, "enablePullDownRefresh": false } }1
2
3
4
5
6
7
8
9
10在
goods_list页面中,和methods节点平级,声明onReachBottom事件处理函数,用来监听页面的上拉触底行为:// 触底的事件 onReachBottom() { // 让页码值自增 +1 this.queryObj.pagenum += 1 // 重新获取列表数据 this.getGoodsList() }1
2
3
4
5
6
7改造
methods中的getGoodsList函数,当列表数据请求成功之后,进行新旧数据的拼接处理:this.goods = [...this.goods, ...res.data.message.goods]1
# 3.2 节流阀处理请求
在 data 中定义
isloading节流阀如下:data() { return { // 是否正在请求数据 isloading: false } }1
2
3
4
5
6修改
getGoodsList方法,在请求数据前后,分别打开和关闭节流阀:// 获取商品列表数据的方法 async getGoodsList() { // ** 打开节流阀 this.isloading = true // 发起请求 const { data: res } = await uni.$http.get('/api/public/v1/goods/search', this.queryObj) // ** 关闭节流阀 this.isloading = false // 省略其它代码... }1
2
3
4
5
6
7
8
9
10
11在
onReachBottom触底事件处理函数中,根据节流阀的状态,来决定是否发起请求:// 触底的事件 onReachBottom() { // 判断是否正在请求其它数据,如果是,则不发起额外的请求 if (this.isloading) return this.queryObj.pagenum += 1 this.getGoodsList() }1
2
3
4
5
6
7
8
# 3.3 是否加载完毕
如果下面的公式成立,则证明没有下一页数据了:
当前的页码值 * 每页显示多少条数据 >= 总数条数
pagenum * pagesize >= total
1
2修改
onReachBottom事件处理函数如下:// 触底的事件 onReachBottom() { // 判断是否还有下一页数据 if (this.queryObj.pagenum * this.queryObj.pagesize >= this.total) return toast('数据加载完毕!') // 判断是否正在请求其它数据,如果是,则不发起额外的请求 if (this.isloading) return this.queryObj.pagenum += 1 this.getGoodsList() }1
2
3
4
5
6
7
8
9
10
11
# 4 下拉刷新
在
pages.json配置文件中,为当前的goods_list页面单独开启下拉刷新效果:"enablePullDownRefresh": true,1监听页面的
onPullDownRefresh事件处理函数:// 下拉刷新的事件 onPullDownRefresh() { // 1. 重置关键数据 this.queryObj.pagenum = 1 this.total = 0 this.isloading = false this.goodsList = [] // 2. 重新发起请求 this.getGoodsList(() => uni.stopPullDownRefresh()) }1
2
3
4
5
6
7
8
9
10
11修改
getGoodsList函数,接收cb回调函数并按需进行调用:// 获取商品列表数据的方法 async getGoodsList(cb) { this.isloading = true const { data: res } = await uni.$http.get('/api/public/v1/goods/search', this.queryObj) this.isloading = false // 只要数据请求完毕,就立即按需调用 cb 回调函数 cb && cb() if (res.meta.status !== 200) return uni.$showMsg() this.goodsList = [...this.goodsList, ...res.message.goods] this.total = res.message.total }1
2
3
4
5
6
7
8
9
10
11
12
# 5. 商品项跳转
在组建内部绑定点击事件
<van-card @click.native="navigatorUrl(item.goods_id)"  :thumb="item.goods_small_logo" v-for="item in goodsList"
          :key="item.goods_id" :title="item.goods_name"></van-card>
1
2在
methods节点中,定义 clickGoodsItem 事件处理函数:
# 6 商品详情
# 6.1 添加商品详情页的编译模式
在微信开发者工具中,点击工具栏上的编译模式下拉菜单,选择
添加编译模式选项: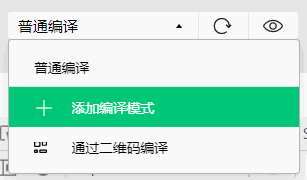
勾选
启动页面的路径,并填写了启动参数之后,点击确定按钮,添加详情页面的编译模式: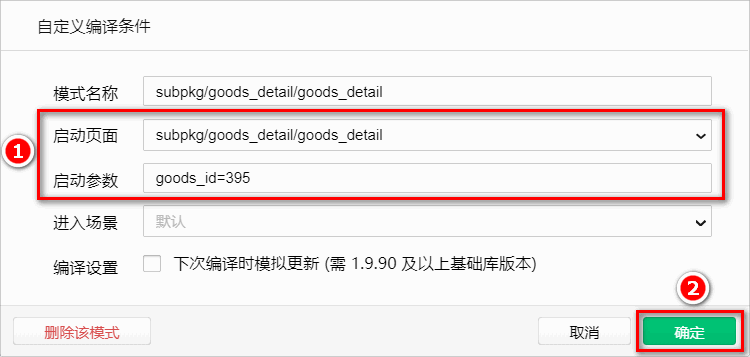
# 6.2 获取商品详情数据
- 在
data中定义商品详情的数据节点:
data() {
  return {
    // 商品详情对象
    goods_info: {}
  }
}
2
3
4
5
6
- 封装api
/*
 * 获取商品详情数据
 */
export const getGoodsDetail = data => fly.get('/goods/detail', data)
2
3
4
- 在
methods中声明getGoodsDetail方法:
<script>
	import {
		getGoodsDetail
	} from '@/api/goods.js'
	export default {
		data() {
			return {
				goods_info: []
			};
		},
		methods: {
			// 定义请求商品详情数据的方法
			async loadGoodsDetail(goods_id) {
				const res = await getGoodsDetail({
					goods_id
				})
				this.goods_info = res
			}
		},
		onLoad(options) {
			// 获取商品 Id
			const goods_id = options.id
			// 调用请求商品详情数据的方法
			this.loadGoodsDetail(goods_id)
		}
	}
</script>
2
3
4
5
6
7
8
9
10
11
12
13
14
15
16
17
18
19
20
21
22
23
24
25
26
27
# 6.3 渲染轮播图区域
使用
v-for指令,循环渲染如下的轮播图 UI 结构:<!-- 轮播图区域 --> <swiper :indicator-dots="true" :autoplay="true" :interval="3000" :duration="1000" :circular="true"> <swiper-item v-for="(item, i) in goods_info.pics" :key="i"> <image :src="item.pics_big"></image> </swiper-item> </swiper>1
2
3
4
5
6美化轮播图的样式:
swiper {
  height: 750rpx;

  image {
    width: 100%;
    height: 100%;
  }
}
1
2
3
4
5
6
7
8
# 6.4 实现轮播图预览效果
为轮播图中的
image图片绑定click事件处理函数:<swiper-item v-for="(item, i) in goods_info.pics" :key="i"> <!-- 把当前点击的图片的索引,传递到 preview() 处理函数中 --> <image :src="item.pics_big" @click="preview(i)"></image> </swiper-item>1
2
3
4在
methods中定义preview事件处理函数:// 实现轮播图的预览效果 preview(i) { // 调用 uni.previewImage() 方法预览图片 uni.previewImage({ // 预览时,默认显示图片的索引 current: i, // 所有图片 url 地址的数组 urls: this.goods_info.pics.map(x => x.pics_big) }) }1
2
3
4
5
6
7
8
9
10
# 6.5 渲染商品信息区域
定义商品信息区域的 UI 结构如下:
<!-- 商品信息区域 -->
<view class="goods-info-box">
  <!-- 商品价格 -->
  <view class="price">¥123</view>
  <!-- 信息主体区域 -->
  <view class="goods-info-body">
    <!-- 商品名称 -->
    <view class="goods-name">123</view>
    <!-- 收藏 -->
    <view class="favi">
      <van-icon name="star-o" size="20px"/>
      <text>收藏</text>
    </view>
  </view>
  <!-- 运费 -->
  <view class="yf">快递:免运费</view>
</view>
1
2
3
4
5
6
7
8
9
10
11
12
13
14
15
16
17注册图标组件
"van-icon": "/wxcomponents/vant/icon/index"1美化商品信息区域的样式:
// 商品信息区域的样式
.goods-info-box {
  padding: 10px;
  padding-right: 0;

  .price {
    color: #c00000;
    font-size: 18px;
    margin: 10px 0;
  }

  .goods-info-body {
    display: flex;
    justify-content: space-between;

    .goods-name {
      font-size: 13px;
      padding-right: 10px;
    }
    // 收藏区域
    .favi {
      width: 120px;
      font-size: 12px;
      display: flex;
      flex-direction: column;
      justify-content: center;
      align-items: center;
      border-left: 1px solid #efefef;
      color: gray;
    }
  }

  // 运费
  .yf {
    margin: 10px 0;
    font-size: 12px;
    color: gray;
  }
}
1
2
3
4
5
6
7
8
9
10
11
12
13
14
15
16
17
18
19
20
21
22
23
24
25
26
27
28
29
30
31
32
33
34
35
36
37
38
39
# 6.6 渲染商品详情信息
在页面结构中,使用
rich-text组件,将带有 HTML 标签的内容,渲染为小程序的页面结构:<!-- 商品详情信息 --> <rich-text :nodes="goods_info.goods_introduce"></rich-text>1
2修改
getGoodsDetail方法,从而解决图片底部空白间隙的问题:// 定义请求商品详情数据的方法 async getGoodsDetail(goods_id) { const { data: res } = await uni.$http.get('/api/public/v1/goods/detail', { goods_id }) // 使用字符串的 replace() 方法,为 img 标签添加行内的 style 样式,从而解决图片底部空白间隙的问题 res.goods_introduce = res.goods_introduce.replace(/<img /g, '<img style="display:block;" ') this.goods_info = res.message }1
2
3
4
5
6
7解决
.webp格式图片在ios设备上无法正常显示的问题:// 定义请求商品详情数据的方法 async getGoodsDetail(goods_id) { const { data: res } = await uni.$http.get('/api/public/v1/goods/detail', { goods_id }) if (res.meta.status !== 200) return uni.$showMsg() // 使用字符串的 replace() 方法,将 webp 的后缀名替换为 jpg 的后缀名 res.message.goods_introduce = res.message.goods_introduce.replace(/<img /g, '<img style="display:block;" ').replace(/webp/g, 'jpg') this.goods_info = res.message }1
2
3
4
5
6
7
8
9
# 6.7 解决商品价格闪烁的问题
导致问题的原因:在商品详情数据请求回来之前,data 中
goods_info的值为{},因此初次渲染页面时,会导致商品价格、商品名称等闪烁的问题。解决方案:判断
goods_info.goods_name属性的值是否存在,从而使用v-if指令控制页面的显示与隐藏:<template> <view v-if="goods_info.goods_name"> <!-- 省略其它代码 --> </view> </template>1
2
3
4
5
# 6.8 渲染商品导航区域的 UI 结构
基于 vant提供的 商品导航组件 (opens new window) 组件来实现商品导航区域的效果
注册组件
"van-goods-action": "/wxcomponents/vant/goods-action/index",
"van-goods-action-icon": "/wxcomponents/vant/goods-action-icon/index",
"van-goods-action-button": "/wxcomponents/vant/goods-action-button/index"
1
2
3在页面中使用商品导航组件:
<van-goods-action>
		  <van-goods-action-icon icon="chat-o" text="客服" bind:click="onClickIcon" />
		  <van-goods-action-icon icon="cart-o" text="购物车" bind:click="onClickIcon" />
		  <van-goods-action-button
		    text="加入购物车"
		    type="warning"
		    bind:click="onClickButton"
		  />
		  <van-goods-action-button text="立即购买" bind:click="onClickButton" />
		</van-goods-action>
1
2
3
4
5
6
7
8
9
10
# 6.9 点击购买跳转到购物车页面
定义事件函数进行跳转